
![]()
![]() Click on the headings to open them. They will open on this page. Open the following link
for further
information about these headings if required.
Click on the headings to open them. They will open on this page. Open the following link
for further
information about these headings if required.
Your browser does not support these headings. To ensure that the contents remain accessible, they have been automatically opened so that all the information on the page is displayed.
However, to take advantage of the headings and to ensure that the layout and design of this site are displayed correctly, you are recommended to upgrade to a current version of one of the following standards compliant browsers:
- Internet Explorer (http://www.microsoft.com/ windows/ie/downloads/ default.mspx)
- Mozilla Firefox (http://www.mozilla.org/ products/firefox/)
- Opera (http://www.opera.com/download/)
Glossary links are included within this page. If a word appears as a link, clicking on this link will show the definition of the word in a 'pop-up window'. Select the following link for information about these glossary links if required.
- Select the links see the definitions in a pop-up window.
- NB. If you use pop-up window blocking software, you will need to deactivate it for pop-ups on this site to use the glossary links. Alternatively, all glossary definitions can be seen on the 'Glossary' page in the 'Resources' section.
- Use of the glossary links is JavaScript dependent. If JavaScript is disabled, it will be necessary to open the 'Glossary' page to view the definitions. Opening this page in a new window may allow you to refer more easily to the definitions while you navigate the site.
 Introduction
The body of an HTML document contains the main display content. It is here that text, images, links, form elements, tables and lists are placed. The following paragraphs give a brief overview of each of the main types of content, with the exception of forms which are covered in the 'Web forms' section of this guide.
In each case, general information about controlling style and layout within tags is included. However, it is a good idea to consider the use of Cascading Style Sheets to create these effects (See the 'Introduction to CSS' section of this guide). This tends to lead to 'cleaner' HTML with less need for repetition of long tags with a great deal of attributes and values for style. It also makes it easier to alter styles across an entire page or series of pages and increases accessibility.
Text
Text
elements
There are a range of elements used to format text. The main ones are headers, paragraphs and line breaks.
There are six levels of headers, marked by a tag with an 'h' followed by a number from 1 (the largest) to 6 (the smallest).
e.g.
<h1>This is my main header</h1>
Text can be positioned on a new line by inserting a line-break
(<br />) or in a new paragraph, by enclosing it in the
<p>...</p> tags.
e.g.
<p>This is the first paragraph</p>

                                                <p>This is the second paragraph which includes a<br
                                                />line break in the middles of the line.</p>
which produces:
This is the first paragraph
This is the second paragraph which includes a
line break in the middles of the line.
Additionally, there are a number of styling tags which can, among other effects, underline, italicise or embolden text. Some of these are:
| Tag | Effect | Comment |
|---|---|---|
| <em>...</em> | Adds emphasis | (Usually renders in a browser as italicised text, but generally preferred to the italicise tag <i>...</i> as it allows the effect to be adapted in specific cases where, for example, the user is using a text-to-speech browser). |
| <strong>...</strong> | Makes text stronger | As above. Usually renders as bold but generally preferred to the <b>...</b> tag. |
| <def>...</def> | Indicates a definition. Usually renders as italics. | Other 'Logical styles' that indicate a particular effect that the browser may interpret in different ways include: <cite>...</cite> for titles, <code>...</code> to show sections of computer code, and <kbd>...</kbd> to represent typed text (usually renders as mono-spaced 'typewriter' style text). |
| <u>...</u> | Underlines text | Care is needed with the use of this tag as underlined text can frequently be confused with hyperlinks. |
| <sup>...</sup> | Places text above the horizontal line (e.g. for footnote numbering) | The <sub>..</sub> tag can also be used to create the opposite effect. |
| <s>...</s> | Produces a |
You can view the default sizes and fonts of the headers and paragraphs in your browser, along with the effects of some of the text styling tags above by selecting the 'view page' link in the following learning activity:
Learning
activity: Text elements
![]() Try adding other tags or changing them to achieve
some of the effects shown above. When you have made
your changes, select the 'view page' link to open
the textbox contents as a new HTML document. Remember
to check that your tags are symmetrical (see 'HTML
tags' section above) and that they are all closed.
If the results are unexpected, try to establish why
this is the case by, if necessary, resetting the textbox
to view the original contents.
Try adding other tags or changing them to achieve
some of the effects shown above. When you have made
your changes, select the 'view page' link to open
the textbox contents as a new HTML document. Remember
to check that your tags are symmetrical (see 'HTML
tags' section above) and that they are all closed.
If the results are unexpected, try to establish why
this is the case by, if necessary, resetting the textbox
to view the original contents.
Text
attributes and values
Alignment
Paragraphs of text can be aligned using the 'align' attribute as follows:
<p align="center">Hello!</p>
This produces the following when placed in an HTML document:
Hello!
Similarly,
<p align="right">Hello!</p>
produces the following when placed in an HTML document:
Hello!
<font>...</font>
For other formatting, the <font>...</font> tag
is required. This takes attributes that affect the chosen typeface,
size and colour, as follows:
| Attribute | Possible values | Comment |
|---|---|---|
| <font size="value"> | 1, 2, 3, 4, 5, 6, 7 +1, +2, +3, +4, +5, +6, +7 -1, -2, -3, -4, -5, -6, -7 |
The default size for paragraph text is 3, with higher
numbers producing larger text. The default size can also be increased or decreased by a certain amount by adding or subtracting by a value from 1 to 7. |
| font face="value" | Any font, or 'font family' (see comment). | It is important to remember that the user's computer may
not have particular fonts that you may wish to use. Using
common fonts is recommended, as is the use of 'font-families'
which provide the browser with information about which fonts
should be used as a replacement in a case where a particular
font is not available. Thus the use of the tag <font
face="Verdana, Arial, Helvetica, sans-serif">
tells the browser to use Arial if Verdana is not available,
followed by Helvetica, and finally by the default sans-serif
font.
|
| font-color="value" | A hash-mark (#), followed by a six-figure 'hexadecimal'
colour code.e.g. #FF0000 = red
|
There are 216 colours in the 'web-safe' colour palette. These colours are recommended as they are not subject to variation on different types of monitors and systems. The resources section contains a link to a palette of web-safe colours organised by either hue (colour) or value (lightness). This makes it easier to design appropriate colour schemes, using these colours. |
<body>
attributes and values
Attributes and values can also be added to the body tag to set default text and link colours and background images and colours for the entire document.
E.g.
A background colour can be applied to the whole document by adding the following:
<body bgcolor="#00ffff">...the body
                                                        of the HTML page goes here...</body>
This adds the following blue background colour to the entire page:
The colour is added through the use of a six-figure 'hexadecimal'
colour code (in this case '#00ffff'). The code is preceded by a hash mark (#). A page containing the codes for the 216 'web-safe' colours can be found in the 'Further resources' section of this module.
Alternatively, a background image can be used as follows.
<body background="bluewhitebg.gif">...</body>
This 'tiles' the image across the screen, repeating it vertically and horizontally to produce a background. The
image (![]() )
is called "bluewhitebg.gif" and is saved in the same folder
as the document. The effect is as follows:
)
is called "bluewhitebg.gif" and is saved in the same folder
as the document. The effect is as follows:
Care must be taken when using such background images as they may not render well on the screen. If text is placed on top of backgrounds created using such images, this may also make the page difficult to read and affect its accessibility.
Text and link colours can be set using the following attributes with different values:
<body text="#000000" link="#000066"
                                                        vlink="#660066" alink="#ff6600">...</body>
This will apply the following colour options to the whole document:
text will be black (#000000).
links will be blue (#000066).
visited links will be purple (#660066).
active links will be orange (#ff6600).
Learning
activity: Text and body attributes and values
![]() Use different alignment options and the following
colours and graphics to experiment with different
text and background attributes and options. When you
have made your changes, select the 'view page' link
to open the textbox contents as a new HTML document.
If the results are unexpected, try to establish why
this is the case by, if necessary, resetting the textbox
to view the original contents.
Use different alignment options and the following
colours and graphics to experiment with different
text and background attributes and options. When you
have made your changes, select the 'view page' link
to open the textbox contents as a new HTML document.
If the results are unexpected, try to establish why
this is the case by, if necessary, resetting the textbox
to view the original contents.
#003333 |
#FF0000 |
#330000 |
#0000FF |
#330033 |
#FFFF99 |
#CCCCFF |
#FFCCFF |
#66FF99 |
#99FF66 |
bggrpx.gif |
bgyelpx.gif |
bgpinkpx.gif |
bggreypx.gif |
bgorpx.gif |
NB. The images for the backgrounds are made by creating very small images which tile across the page to form a background. Most of the images in the table above are too small to be visible as individual images.
Links
Linking
text
The basic tag for creation of links is:
<a href="http://www.le.ac.uk">Click
                                                to go to the University of Leicester homepage</a>
This produces a link as follows:
It is possible to change the link through adjusting the position of the tags:
<p>Click to go to <a href="http://www.le.ac.uk">the
                                                University of Leicester</a> homepage</p>
This produces:
Click to go to the University of Leicester homepage
It is important to avoid enclosing other tags such as paragraph tags within the link tags as this is likely to prevent the link from working correctly.
A basic link will open in the same window. To open the link
in a new window, target="_blank" is added:
<p>Click to go to open <a href="http://www.le.ac.uk"
                                                target="_blank">the University of Leicester</a>
                                                homepage in a new window</p>
produces:
Click to go to open the University of Leicester homepage in a new window
Where these types of links are used, it is good practice to inform the user that the link opens in a new window and to ensure that such links are used consistently throughout. This is likely to reduce the usability problems that can occur when users are unaware that a new window has been opened and are thus confused by the fact the 'back' button appears to have been deactivated.
Linking
images
Images can also be used as links:
<a href="http://www.le.ac.uk"><img src="leicester.gif"
                                                width="192" height="54"></a>
This produces:

Linking from an image automatically adds a border around the
image. To remove this, border="0" is
added to the link. As with all images, it is also necessary
to add 'alt' text to provide an alternative description for
text-only browsers or in any situation when the image cannot
be displayed.
<a href="http://www.le.ac.uk"><img
                                                src="leicester.gif" width="192" height="54"
                                                border="0" alt="University of Leicester logo.
                                                Click to go to home page." ></a>
produces the following:
Email
links and links within pages
It is also possible to add a mailto link which automatically opens
the user's email program (if available) with the correct address
automatically filled in:
<p>Our email address is <a href="mailto:OnlineRM@le.ac.uk">OnlineRM@le.ac.uk</a></p>
This produces:
Our email address is OnlineRM@le.ac.uk
N.B. It is a good idea to add the email address in full within the link (as above) rather than using a link such as email us. This allows users who do not have or use an email program that can be automatically activated to see and copy the address easily.
A final type of link that can be used is a link within a page. This is done by inserting anchors in the page at the point you wish to link to The anchors are named using <a name="insert name here""></a> tags. The following tags produce anchor links to the headings 'Anchor 1' and 'Anchor 2'.
<h2><a name="Anchor1"></a>
Anchor 1</h2>
<p> </p>
<h2><a name="Anchor2"></a> Anchor 2</h2>
This produces:
To link to these anchors, the following code is used so that when the link is clicked, the user is taken to the appropriate anchor point.
<p>Link to <a href="#Anchor1">Anchor
1</a></p>
<p> </p>
<p>Link to <a href="#Anchor2">Anchor 2</a></p>
This produces the following links. Their effect can be seen by selecting them.
Such links can be used within a questionnaire to add skip patterns allowing participants to click on links to different different points in a one-page questionnaire depending on their answers to particular questions.
Relative
and absolute linking
Links between pages are of fundamental importance in the creation
of a website. Absolute linking involves the inclusion of the
entire URL as it would appear in the browser (e.g http://www.le.ac.uk/etc/etc.htm).
This would be the typical way of linking to external sites.
However, the usual method of linking pages of the same site and located on the same server is through the use of relative links. This section explains how these links work.
If all the site files are located in the same folder:
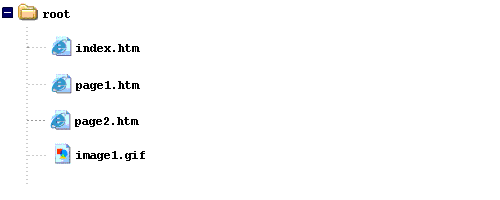
they are linked simply by adding the name of the document to be linked to.
E.g. For a link on the homepage (index.htm) to 'page1.htm', it is simply necessary to include the page name and extension in the link:
 <a href="page1.htm">Page
                                            1</a>
If the folder was placed on the server for the URL 'http://www.le.ac.uk', the link would take the user to the following URL:
http://www.le.ac.uk/page1.htm
Similarly, if 'page2.htm' includes an image called 'image1.gif' it is simply necessary to link to the image through its name and extension.
 <img src="image1.gif"
                                            alt="description text goes here..." />
However, if the page is held in a folder:
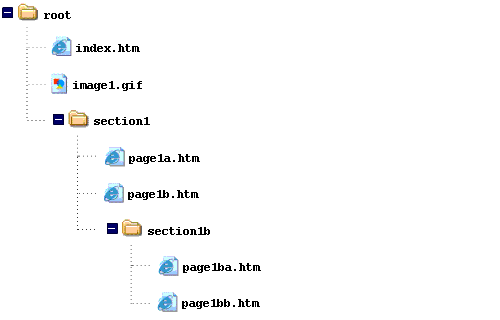
it is linked by including the folder name.
E.g. A link on the homepage (index.htm) to 'page1a.htm' is as follows:
 <a href="section1/page1a.htm">Page
                                            1a</a>
The folder name must be included with a forward slash
E.g. 2. A link on the homepage (index.htm) to 'page1ba.htm' is as follows:
 <a href="section1/section1b/page1ba.htm">Page
                                            1ba</a>
Both folder names in the path are included.
If the folder structure was then placed on the server for the URL 'http://www.le.ac.uk', the link would take the user to the following URL:
http://www.le.ac.uk/section1/section1b/page1ba.htm
For a link to a page further up the file tree, '../'
is added to the link.
E.g. for a link from 'page1ba.htm' to 'index.htm', the link would be as follows:
 <a href="../../index.htm">Home
                                            page</a>
Using this notation in combination, it is possible to link to any file in the same site.
Consider the following folder structure:
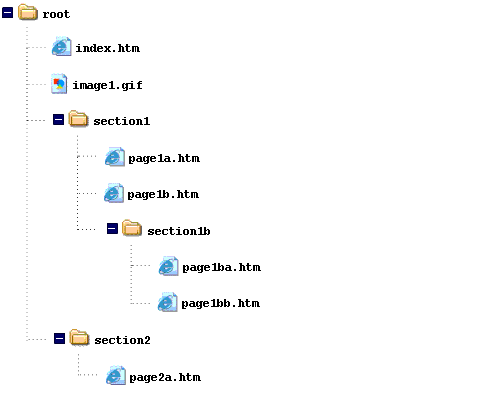
A link from 'page1ba.htm' to 'page2a.htm' would be as follows:
<a href="../../section2/page2a.htm">Page2a</a>
i.e. open the page called 'page2a.htm in the folder called 'section2' in the folder two levels above this one ('section1b').
and a link from 'page2a.htm' to 'page1ba.htm' would be:
<a href="../section1/section1b/page1ba.htm">Page1ba</a>
i.e. open the page called 'page1ba.htm in the folder called 'section1b' in the folder called 'section1' in the folder one level above this one ('section2').
Learning
activity: Linking
![]() Check your understanding of linking by answering the following
multiple-choice questions. Use the 'next' and 'back' buttons
to move between questions or review and change your answers.
An alternative text-only version is provided below.
Check your understanding of linking by answering the following
multiple-choice questions. Use the 'next' and 'back' buttons
to move between questions or review and change your answers.
An alternative text-only version is provided below.
Text-only
alternative
![]() Check
your understanding of linking by answering the following
multiple-choice questions. Select 'Answers' at the
bottom of this section for feedback.
Check
your understanding of linking by answering the following
multiple-choice questions. Select 'Answers' at the
bottom of this section for feedback.
1. Which one of the following links is correct?
a. <p><ahref="http://www.le.ac.uk">The
University of Leicester</a></p>
b. <p><a href="http://www.le.ac.uk">The
University of Leicester</a></p>
c. <p><a href="http://www.le.ac.uk">The
University of Leicester</p></a>
d. <p><a ref="http://www.le.ac.uk">The
University of Leicester</a></p>
2. Which of the following attribute and value combinations for the <a href> tag will open a link in a new window?
a. target="_blank
b. target="_new
c. target="_parent
d. target="_top
3. Which of the following links correctly refers to the following anchor: '<a name="Anchor1"></a>'?
a. <a href="=Anchor1">Anchor 1</a>
b. <a href="@Anchor1">Anchor 1</a>
c. <a href="Anchor1">Anchor 1</a>
d. <a href="#Anchor1">Anchor 1</a>
4. In the following site file structure, what would be the correct link in "page1ba.htm" to "index.htm?
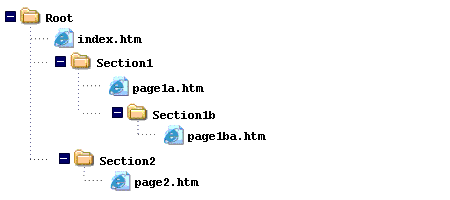
a. <a href="../index.htm">Home page</a>
b. <a href="index.htm">Home page</a>
c. <a href="../../index.htm">Home page</a>
d. <a href="../../../root/index.htm">Home page</a>
5. In the following site file structure, what would be the correct link in "page2.htm" to "page1ba.htm"?
a. <a href="../section1/section1b/page1ba.htm">page1ba</a>
b. <a href="page1ba.htm">page1ba</a>
c. <a href="../index/section1b/page1ba.htm">page1ba</a>
d. <a href="root/index.htm">page1ba</a>
Answers
1=b. This is the only link with the correct "a href" tag and with no other tag within the link.
a is incorrect because a space is needed between "a"
and "href".
c is incorrect because the paragraph tag is inside the link.
d is incorrect because the correct tag is "a href",
not "a ref".
2=a. Of the other options, "_parent" and "_top" are genuine values, but they will not open a new window. "_parent" is useful for opening a link from a frame in the window, and "_top" opens a link in the uppermost window. The value "_new" does not exist.
3=d. "#" is the correct prefix for an anchor link.'
4=c.
a is incorrect because the browser would attempt to link
to a file one folder above "page1ba.htm".
b is incorrect because the browser would attempt to link
to a file in the same folder as "page1ba.htm".
d is incorrect because the browser attempt to access a folder
above the root folder.
5=a.
b is incorrect because the browser would attempt to link
to a file in the same folder as "page2.htm".
c is incorrect because the browser would attempt to link
to a file in a non-existent folder called "index".
d is incorrect because the browser would attempt to access
a folder called "root" in the same folder as "page2.htm".
Images
Formats
Though others are available, the two most common types of
images in use on the internet remain the Graphic Interchange
Format (GIF) and Joint Photographic Experts Group formats (JPEG).
The filename extension for a gif is imagename.gif and
for a JPEG, imagename.jpg.
In general terms, the use of gifs is more appropriate for graphics with a limited number of colours or line drawings. Jpegs are suitable for images with a greater number of colours such as photographs.
In either case, it is essential that the correct extension is used for the image to work.
Attributes
and values
As seen in the links section above, the basic tag for the insertion of an image is as follows:
<img src="imagename.gif" />
The image source (src) value is the path to the file name which can be expressed in absolute or relative terms (see the links section).
In addition to this, the following attributes and values are available for use. Some should be always be included, while others are optional.
| Attribute | Possible values | Comment |
|---|---|---|
| width="value" height="value" |
a value in pixels. E.g. width="50" height="50" |
Although an image that is included without the height and width attributes will display at its original size, it is good practice to always include them. This allows the browser to load the information more effectively and to layout the page correctly even before the image loads. This is helpful for slow connections. |
| alt="value" | A description of the purpose or function of the image
to allow its significance to be understood by users who
have text-only browsers or in any situation when the image
cannot be displayed. |
To make pages accessible, all images should have an alt
description. However, it is not necessary to describe every
detail. The text should give as concise an indication of
the image's function as possible. Where longer descriptions
are required, these should be provided through links. Images with no importance such as spacing images should be given an empty alt tag "" to make it clear that this is the case. Any images used for buttons, icons, logos etc, should provide the information in the clearest and most concise way possible. E.g. "*", "[?]", "[!]". |
| border="value" | A value in pixels. E.g. border="2" |
This is most commonly used to remove the border automatically placed around images used as links, by adding a value of "0". |
| align="value" | left, right top, middle, bottom E.g. align="top" |
To centre an image it is necessary to place it within
a centered paragraph using the <p></p> tags.
This can also be used to align left or right. The top, middle and bottom values align the image on the horizontal line. |
| hspace="value" vspace="value" |
A value in pixels E.g. vspace="10" hspace="10" |
Sets the space around the top and bottom edges (vspace)
and left and right edges (hspace) of and image. |
Example
The following full image tag:
<p align="center">Text<img
                                            src="leicester.gif"alt="University of Leicester
                                            logo." width="192" height="54" hspace="20"
                                            vspace="10" border="5" align="top"
                                            / >Text.</p>
produces the following:
Text
Text
Learning
activity: Images
![]() To check your understanding of images, the code that produced
the image in the example above is reproduced in the textbox
below. It has been repeated to allow you to change the
values in different ways and compare the effects. When
you have made your changes, select the 'view page' link
to open the textbox contents as a new HTML document. Remember
to check for the correct spacing and use of inverted commas
between attributes and values. If the results are unexpected,
try to establish why this is the case by, if necessary,
resetting the textbox to view the original contents.
To check your understanding of images, the code that produced
the image in the example above is reproduced in the textbox
below. It has been repeated to allow you to change the
values in different ways and compare the effects. When
you have made your changes, select the 'view page' link
to open the textbox contents as a new HTML document. Remember
to check for the correct spacing and use of inverted commas
between attributes and values. If the results are unexpected,
try to establish why this is the case by, if necessary,
resetting the textbox to view the original contents.
Lists
List elements
The creation of lists in web pages is straightforward. It basically involves the following tag pattern:
<type of list>
<list item>First list item</list item>
<list item>Second list item</list item>
<list item>Third list item</list item>
</type of list>
The three main types of list are shown in the table with the HTML that produced them.
An unordered list (bullets) is as follows:
|
An ordered list (numbered) is as follows:
|
A definition list is as follows:
|
<ul> |
<ol> |
<dl> |
'Nested' lists
It is also possible to 'nest' a list within a list.
E.g. if an unordered list (ul) is placed inside one of the items of an ordered list (ol), as follows:
<ol>

                                                <li>Item 1</li>

                                                <li>Item 2

                                                <ul>

                                                <li>Item 2a</li>

                                                <li>Item 2b</li>

                                                <li>Item 2c</li>

                                                </ul>
</li>

                                                <li>Item 3</li>

                                                </ol>
The result is a nested list as follows:
- Item 1
- Item 2
- Item 2a
- Item 2b
- Item 2c
- Item 3
It is important to remember to close all tags in a list correctly and maintain symmetrical tagging. It can become difficult to track the tags in a nested list, and any unclosed or unsymmetrical tags may affect the way the list renders in a browser.
E.g. The tags for a basic nested list should be symmetrical, as follows:
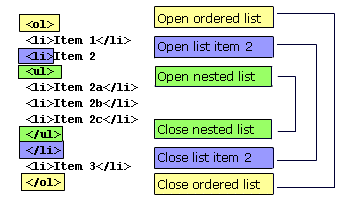
The symmetrical tag structure in a nested list.
Tables
Tables can be used in web pages for the presentation of data under headings. Because they allow for the precise placement of information on the screen, they are often also used to provide the overall layout for web pages. In either case, the basic elements, attribute and values used to create the table and its rows and cells are the same.
Table
elements
The element tags for the creation of a table are as follows:
| <table>...</table> | The beginning and end of a table. |
| <tr>...</tr> | The beginning and end of a row. |
| <td>...</td> | The beginning and end of a piece of table data (a cell). |
Thus, the following code creates a 2x2-cell table:
<table>

                                                <tr>

                                                <td>cell 1</td>

                                                <td>cell 2</td>

                                                </tr>

                                                <tr>

                                                <td>cell 3</td>

                                                <td>cell 4</td>

                                                </tr>

                                                </table>
| cell 1 | cell 2 |
| cell 3 | cell 4 |
Further columns can be added by increasing the number of <td>...</td>
tags (New lines are marked with ![]()
<table>
<tr>
<td>cell 1</td>
<td>cell 2</td>
![]() <td>cell
3</td>
<td>cell
3</td>
</tr>
<tr>
<td>cell 4</td>
<td>cell 5</td>
![]() <td>cell
6</td>
<td>cell
6</td>
</tr>
</table>
| cell 1 | cell 2 | cell 3 |
| cell 4 | cell 5 | cell 6 |
and further rows can be added by increasing the number of <tr>...</tr>
tags (New lines are marked with ![]()
<table>

                                                <tr>

                                                <td>cell 1</td>

                                                <td>cell 2</td>

                                                </tr>

                                                <tr>

                                                <td>cell 3</td>

                                                <td>cell 4</td>
</tr>
![]() <tr>
<tr>
![]() <td>cell
5</td>
<td>cell
5</td>
![]() <td>cell
6</td>
<td>cell
6</td>
![]() </tr>
</tr>
</table>
| cell 1 | cell 2 |
| cell 3 | cell 4 |
| cell 5 | cell 6 |
Table
layout
The browser renders the table width as the maximum number of cells on any one row. It then lines the cells on other rows up with these cells. If a row has fewer cells than this maximum, it will not automatically stretch these cells to fill the space but will line them up with the ones in the longest row, and leave an empty space in the table.
Thus a table with 2 cells on row 1, 3 cells on row 2, and 1 cell on row 3, as follows:
<table>
<tr>
<td>cell 1</td>
<td>cell 2</td>
</tr>
<tr>
<td>cell 3</td>
<td>cell 4</td>
<td>cell 5</td>

                                                </tr>

                                                <tr>

                                                <td>cell 6</td>

                                                </tr>

                                                </table>
would produce the following (a background has been applied to the cells to show the spacing clearly):
| cell 1 | cell 2 | |
| cell 3 | cell 4 | cell 5 |
| cell 6 |
In order to stretch the cells to fill the space in the table, the column-span attribute (colspan) is used.
Thus, if colspan = "2" is added to the HTML creating the first row as follows:
<tr>

                                                <td>cell 1</td>

                                                <td colspan="2">cell 2</td>

                                                </tr>
the result is:
| cell 1 | cell 2 | |
| cell 3 | cell 4 | cell 5 |
| cell 6 | ||
Similarly, if colspan="3" is added to the <td> tag in the third row, the result is:
| cell 1 | cell 2 | |
| cell 3 | cell 4 | cell 5 |
| cell 6 | ||
In the same way, the row-span attribute (rowspan) is used to control the spacing of rows.
If rowspan = "2" is added to the HTML creating the second row as follows:
<tr>

                                                <td>cell 3</td>

                                                <td rowspan="2">cell 4</td>
<td rowspan="2">cell 5</td>

                                                </tr>
the result is:
| cell 1 | cell 2 | |
| cell 3 | cell 4 | cell 5 |
| cell 6 |
Note that this only works down a table. Adding rowspan ="3"
to cell five will only be effective if the cell is moved
to the first row as follows:
<table>

                                                <tr>

                                                <td>cell 1</td>

                                                <td>cell 2</td>

                                                <td rowspan="3">cell 5</td>
                                                </tr>

                                                <tr>

                                                <td>cell 3</td>

                                                <td rowspan="2">cell 4</td>
                                                </tr>

                                                <tr>

                                                <td>cell 6</td>

                                                </tr>

                                                </table>
| cell 1 | cell 2 | cell 5 |
| cell 3 | cell 4 | |
| cell 6 |
It is also possible to place a new table within a table cell.
<table>

                                                <tr>

                                                <td>cell 1

                                                <table>

                                                <tr>

                                                <td>cell a</td>

                                                <td>cell b</td>

                                                </tr>

                                                <tr>

                                                <td>cell c</td>

                                                <td>cell d</td>

                                                </tr>

                                                </table>
</td>

                                                <td>cell 2</td>

                                                </tr>

                                                <tr>

                                                <td>cell 3</td>

                                                <td>cell 4</td>

                                                </tr>

                                                </table>
Cell 1
|
cell 2 | ||||
| cell 3 | cell 4 |
A great deal of control can be added to the spacing of tables though the use of tables within table cells, alongside colspan and rowspan. It is thus common to use them to create the overall layout for webpages.
Where this is done, however, it is important to be aware of how the information may be presented for users of text-only browsers or screen-reading software, which 'read' the information from left to right.
For example, in the following table, a text-only browser would be likely to present the information from cell 5 before cells 3 and 4.
| cell 1 | cell 2 | cell 5 |
| cell 3 | cell 4 | |
| cell 6 |
It is also important to use relative sizing (e.g. in percentages) rather than absolute sizing (e.g. in pixels) to ensure that the table will be visible on a range of screen sizes. (See the 'Key design issues' section of this technical guide for further information on this issue).
Learning
activity: Table layout
![]() To check your understanding of table layout, identify
the HTML code that produced the following tables.
An alternative text-only version is provided below.
To check your understanding of table layout, identify
the HTML code that produced the following tables.
An alternative text-only version is provided below.
Text-only
alternative
![]() Check
your understanding of table layout by identifying
the HTML code (a-f) that produced the following
tables (1-6). Select 'Answers' at the bottom of
this section to check.
Check
your understanding of table layout by identifying
the HTML code (a-f) that produced the following
tables (1-6). Select 'Answers' at the bottom of
this section to check.
1.
| 1 | 2 |
| 3 | 4 |
| 5 | 6 |
2.
| 1 | 4 |
| 2 | 5 |
| 3 | 6 |
3.
| 1 | 2 | 3 |
| 4 | 5 | 6 |
4.
| 1 | 2 |
| 3 | |
| 4 | 5 |
5.
| 1 | 2 | |
| 3 | 4 | 5 |
6.
| 1 | 2 | |
| 3 | 4 | |
a.
<table>

                                                                        <tr>

                                                                        <td>1</td>

                                                                        <td>2</td>

                                                                        <td>3</td>

                                                                        </tr>

                                                                        <tr>

                                                                        <td>4</td>

                                                                        <td>5</td>

                                                                        <td>6</td>

                                                                        </tr>

                                                                        </table
>
b.
<table>

                                                                        <tr>

                                                                        <td>1</td>

                                                                        <td>2</td>

                                                                        </tr>

                                                                        <tr>

                                                                        <td>3</td>

                                                                        <td>4</td>

                                                                        </tr>

                                                                        <tr>

                                                                        <td>5</td>

                                                                        <td>6</td>

                                                                        </table
>
c.
<table>

                                                                        <tr>

                                                                        <td colspan="2">1</td>

                                                                        <td>2</td>

                                                                        </tr>

                                                                        <tr>

                                                                        <td>3</td>

                                                                        <td>4</td>

                                                                        <td>5</td>

                                                                        </tr>

                                                                        </table
>
d.
<table>

                                                                        <tr>

                                                                        <td colspan="2">1</td>

                                                                        <td rowspan="2">2</td>

                                                                        </tr>

                                                                        <tr>

                                                                        <td>3</td>

                                                                        <td>4</td>

                                                                        </tr>

                                                                        </table
>
e.
<table>

                                                                        <tr>

                                                                        <td>1</td>

                                                                        <td>4</td>

                                                                        </tr>

                                                                        <tr>

                                                                        <td>2</td>

                                                                        <td>5</td>

                                                                        </tr>

                                                                        <tr>

                                                                        <td>3</td>

                                                                        <td>6</td>

                                                                        </table
>
f.
<table>

                                                                        <tr>

                                                                        <td rowspan="2">1</td>
                                                                        <td>2</td>

                                                                        </tr>

                                                                        <tr>

                                                                        <td>3</td>

                                                                        </tr>

                                                                        <tr>
                                                                        <td>4</td>

                                                                        <td>5</td>

                                                                        </tr>

                                                                        </table
>
Attributes
and values
The attributes used to format the style and layout of tables
are applied to the table tag <table attribute ="value">...</table>
and the table cell tags <td attribute="value">...</td>.
Table attributes and values
| Attribute | Possible values | Comment |
|---|---|---|
| width="value" |
A value in terms of the percentage of the screen width
(relative width) E.g. width="90%". or in pixels (absolute width) E.g. width="550".
|
Care must be taken when using absolute width to ensure that the table can be viewed on smaller screens. (see 'Key design issues' section of this technical guide). |
| border="value" |
a value in pixels. |
A zero border value is likely to be used where tables are used for page layout and positioning. |
| cellspacing="value" | a value in pixels. |
Defines the space between table cells. |
| cellpadding="value" | A value in pixels. |
Defines the space within table cells between the cell border and the content. |
| align="value" | left, center, right. |
Used to align the entire table on the page. Only needed where a left-alignment is not required as this is the default alignment. |
| bgcolor="value" | A hash-mark (#), followed by a six-figure 'hexadecimal' colour code. | Sets the background colour of the table. |
| bordercolor="value" | A hash-mark (#), followed by a six-figure 'hexadecimal' colour code. | Sets the outside border colour of the table. |
Table cell attributes and values
| Attribute | Possible values | Comment |
|---|---|---|
| width="value" |
A value in terms of the percentage of the table width
(relative width) E.g. width="50%". or in pixels (absolute width) E.g. width="250".
|
relative sizing for table cells can be used to set a proportional width within absolutely or relatively-sized tables. |
| height="value" | a value in pixels. |
Sets the height of individual cells (The entire row takes the height of the largest cell). |
| align="value" | left, center, right. |
Sets the horizontal alignment of individual cells. |
| valign="value" | top, middle, bottom. | Sets the vertical alignment of individual cells. |
| bgcolor="value" | A hash-mark (#), followed by a six-figure 'hexadecimal' colour code. | Sets the background colour of the table. |
| bordercolor="value" | A hash-mark (#), followed by a six-figure 'hexadecimal' colour code. | Sets the border colour of individual cells. |
Learning
activity: Table attributes and values
![]() Use different table attributes to change the style
and layout of the table produced by the following
HTML. When you have made your changes, select the
'view page' link to open the textbox contents as a
new HTML document. If the results are unexpected,
try to establish why this is the case by, if necessary,
resetting the textbox to view the original contents.
Use different table attributes to change the style
and layout of the table produced by the following
HTML. When you have made your changes, select the
'view page' link to open the textbox contents as a
new HTML document. If the results are unexpected,
try to establish why this is the case by, if necessary,
resetting the textbox to view the original contents.
#003333 |
#FF0000 |
#330000 |
#0000FF |
#330033 |
#FFFF99 |
#CCCCFF |
#FFCCFF |
#66FF99 |
#99FF66 |
Learning
activity: Review
Part 1
Text-only
alternative
![]() Check
your understanding of basic HTML by deciding whether the
following statements are true or false. All the statements
relate to information from the contents of parts 1 and
2 of this introduction. Select 'Answers' below for feedback.
Check
your understanding of basic HTML by deciding whether the
following statements are true or false. All the statements
relate to information from the contents of parts 1 and
2 of this introduction. Select 'Answers' below for feedback.
1. A simple text editor and browser software is all that is needed to create HTML pages.
2. The head of an HTML document generally contains information which is intended to be displayed.
3. Cascading stylesheet information can be placed directly in the head of a document or in a linked file.
4. HTML has six levels of headers, marked by an 'h' followed by 1 (the smallest) to 6 (the largest).
5. It is generally better to use 'Logical styles' such as '<em>' than physical ones such as '<i>'.
6. Images can be used as links from one web page to another.
7. For a link to a page further up the file tree, '.../' is added to the link.
8. There are three main types of lists in HTML documents: Bulleted, numbered and definition lists.
9. It is possible to place an HTML table inside a cell of another HTML table.
10. A space should be left between elements, attributes and values.
Answers
1. A simple text editor and browser software is all
that is needed to create HTML pages.
TRUE: WYSIWYG (What-You-See-Is-What-You-Get) editors
can be used to simplify the process, but they create
HTML as text.
2. The head of an HTML document generally contains
information which is intended to be displayed.
FALSE: The head generally contains information not intended
for display such as scripts, metadata, and css information.
The title is also included which displays in the browser.
3. Cascading stylesheet information can be placed
directly in the head of a document or in a linked file.
TRUE. A stylesheet file (.css) can be linked in the
head of the document.
4. HTML has six levels of headers, marked by an 'h'
followed by 1 (the smallest) to 6 (the largest).
FALSE: <h1></h1> is the largest header,
and <h6></h6> is the smallest.
5. It is generally better to use 'Logical styles'
such as '<em></em>' than physical ones such
as '<i></i>'.
TRUE: They allows the effect to be adapted by different
browsers so that, for example, there will be a change
of voice emphasis in a text-to-speech browser.
6. Images can be used as links from one web page to
another.
TRUE: They can be linked in the same way as text.
7. For a link to a page further up the file tree,
'.../' is added to the link.
FALSE: The correct notation is '../' not '.../'. E.g.
'../myfolder/myfile.htm'.
8. There are three main types of lists in HTML documents:
Bulleted, numbered and definition lists.
TRUE.
9. It is possible to place an HTML table inside a
cell of another HTML table.
TRUE.
10. A space should be left between elements, attributes
and values.
FALSE: The correct spacing is: <element attribute="value".
Part 2
![]() Look at the following screenshot of an HTML page. The code
that produced this page is reproduced below with gaps. Complete
the gaps in the code. An alternative text-only version is
provided below.
Look at the following screenshot of an HTML page. The code
that produced this page is reproduced below with gaps. Complete
the gaps in the code. An alternative text-only version is
provided below.
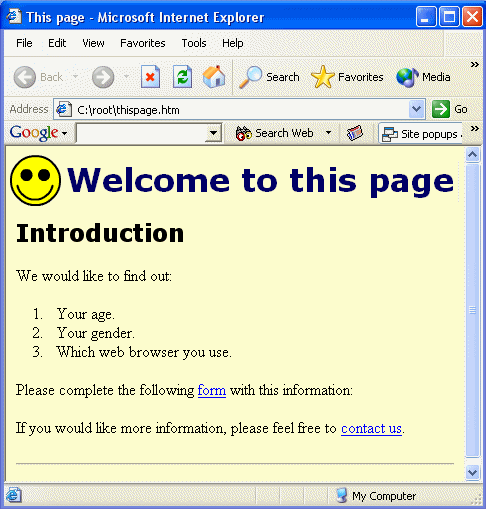
Screenshot of HTML page
Description
The top left of the page has am image of a smiley face, with the heading 'Welcome to this page' in blue. Under this, there is a smaller heading in black which says 'Introduction'. This is followed by black text with the following: We would like to find out (new paragraph) 1. Your age. (new line) 2. Your gender (new line) 3. Which web browser you use. (New paragraph) Please complete the following form with this information ('form' is hyperlinked). (New paragraph) If you would like more information, please feel free to contact us ('contact us' is hyperlinked). There is then a horizontal line.
Text-only
alternative
![]() Look
at the following screenshot of an HTML page. The code
that produced this page is reproduced below with gaps.
The missing information is given below, and you should
use this to complete the gaps in the code. Select 'Answers'
at the bottom of this section for feedback.
Look
at the following screenshot of an HTML page. The code
that produced this page is reproduced below with gaps.
The missing information is given below, and you should
use this to complete the gaps in the code. Select 'Answers'
at the bottom of this section for feedback.
Screenshot of HTML page
Description
The top left of the page has am image of a smiley face, with the heading 'Welcome to this page' in blue. Under this, there is a smaller heading in black which says 'Introduction'. This is followed by black text with the following: We would like to find out (new paragraph) 1. Your age. (new line) 2. Your gender (new line) 3. Which web browser you use. (New paragraph) Please complete the following form with this information ('form' is hyperlinked). (New paragraph) If you would like more information, please feel free to contact us ('contact us' is hyperlinked). There is then a horizontal line.
Missing information:
"mailto | img src |
</ol> | </font></h1>
| </head> | <strong>
| <ol> | <body | title>
| <hr | <a href=" |
html
HTML Document:
Answers
The complete HTML is as follows:
<! DOCTYPE HTML PUBLIC "-//W3C//DTD
                                                                    HTML 4.01 Transitional//EN">

                                                                    <html>

                                                                    <head>

                                                                    <title> This page</title>

                                                                    <meta http-equiv="Content-Type" content="text/html;
                                                                    charset=iso-8859-1">

                                                                    </head>

                                                                    <body bgcolor="#FFFFCC">

                                                                    <h1><font color="#000066" face="Verdana,
                                                                    Arial, Helvetica, sans-serif">

                                                                    <img src="smiley.gif" width="32"
                                                                    height="32">Welcome to this page</font></h1>


                                                                    <h2><font face="Verdana, Arial, Helvetica,
                                                                    sans-serif">Introduction</font></h2>

                                                                    <p>We would like to find out:</p>

                                                                    <ol>

                                                                    <li>Your age.</li>

                                                                    <li>Your gender.</li>

                                                                    <li>Which web browser you use.</li>

                                                                    </ol>

                                                                    <p>Please complete the following <a href="
                                                                    egform.htm">form </a> with this information:</p>

                                                                    <p>If you would like more information, please
                                                                    feel free to

                                                                    <a href="mailto:adddress@le.ac.uk">contact
                                                                    us</a>.</p>

                                                                    <hr />

                                                                    </body>

                                                                    </html>
Links to further information about HTML including reference information and tutorials can be found in the 'Further resources' section of this module.