
![]()
![]() Click on the headings to open them. They will open on this page. Open the following link
for further
information about these headings if required.
Click on the headings to open them. They will open on this page. Open the following link
for further
information about these headings if required.
Your browser does not support these headings. To ensure that the contents remain accessible, they have been automatically opened so that all the information on the page is displayed.
However, to take advantage of the headings and to ensure that the layout and design of this site are displayed correctly, you are recommended to upgrade to a current version of one of the following standards compliant browsers:
- Internet Explorer (http://www.microsoft.com/ windows/ie/downloads/ default.mspx)
- Mozilla Firefox (http://www.mozilla.org/ products/firefox/)
- Opera (http://www.opera.com/download/)
Glossary links are included within this page. If a word appears as a link, clicking on this link will show the definition of the word in a 'pop-up window'. Select the following link for information about these glossary links if required.
- Select the links see the definitions in a pop-up window.
- NB. If you use pop-up window blocking software, you will need to deactivate it for pop-ups on this site to use the glossary links. Alternatively, all glossary definitions can be seen on the 'Glossary' page in the 'Resources' section.
- Use of the glossary links is JavaScript dependent. If JavaScript is disabled, it will be necessary to open the 'Glossary' page to view the definitions. Opening this page in a new window may allow you to refer more easily to the definitions while you navigate the site.
 Introduction
HTML (Hyper Text Markup Language) is the technical language that lies behind most web pages. Increasingly it is possible to get by without a great deal knowledge of HTML by using WYSIWYG (What You See Is What You Get) software packages such as Macromedia Dreamweaver or Microsoft FrontPage. These tools allow you to create webpages and online questionnaires without any knowledge of HTML, but a basic knowledge remains useful as it will give you more control and allow you to deal with any problems that emerge more quickly.
This page will provide the knowledge required to produce an HTML page. Even if you intend to use a WYSIWYG package to create your online questionnaires it is still worth spending a short time developing a basic knowledge of HTML.
To produce a web page effectively, the only requirement is that
you have a simple text
editor, such as notepad for windows, and a browser
such as MS Explorer or or Mozilla Firefox in which you can test
your pages. The next section explains how to use these tools, and
it can be ignored if you are using a WYSISYG editor.
Producing
and editing web pages
The basic steps in producing and editing web pages are as follows:
Producing an HTML
document
The first step in creating a web page is to produce a text file and save it as HTML.
To do this, you will need to open your text editor and copy the following basic web page into it:
<!DOCTYPE HTML PUBLIC "-//W3C//DTD HTML 4.01 Transitional//EN">
<html>
<head>
<title>My web page</title>
<meta http-equiv="Content-Type" content="text/html;
                                                charset=iso-8859-1">
</head>
<body>
<h1>My Page</h1>
<p>Welcome to my web page</p>
</body>
</html>
You then need to save the file as an html page by adding an '.html' or an '.htm' extension. Certain servers require a three-letter extension which means that it is probably safer to use the 'htm' extension, although in most cases, there is no difference between them. In notepad, the save is done by choosing the options shown below. You should choose a folder to save the file in and remember where you saved this file.

Notepad save options
Viewing the
document
To view this document, start your browser, and open the page by choosing 'File', then 'Open'. NB. Make sure you are working offline if you pay for your internet connection time. It is not necessary to be connected to view files saved on your computer (local files).
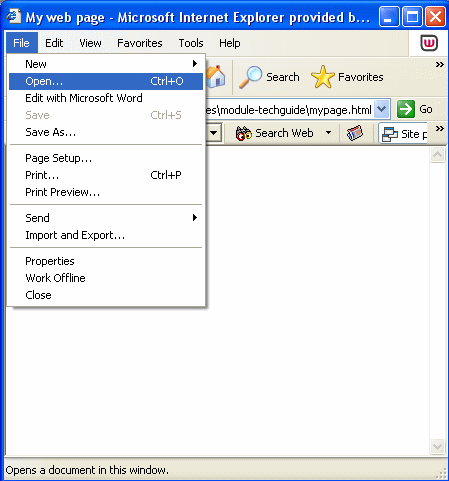
Internet Explorer 'File' -'Open'
This will allow you to type the location and file name into the dialogue box (shown below), or select browse to navigate to the correct location.
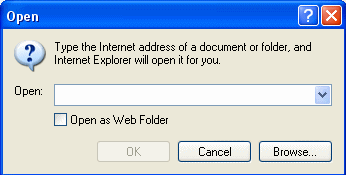
Internet Explorer 'open' dialogue box
Changing the
document
To make changes to the web page, you should change the source file in notepad, save the file, then refresh the page in your browser, by using the 'refresh' or 'reload' buttons (shown below).
Refresh buttons from three popular browsers
You can open the source file of your own page to make changes by selecting 'View', then 'Source', as shown below.
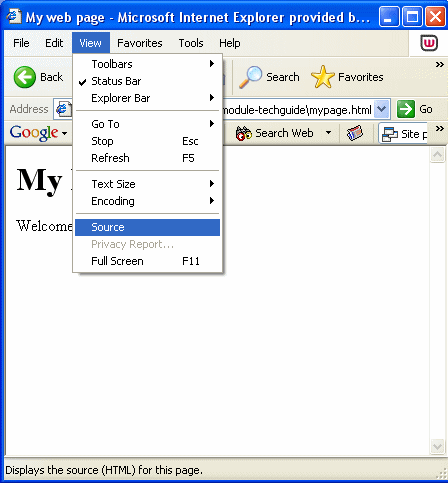
Internet Explorer 'View' -' Source'
You can also use this to view the HTML source of any web page on the internet. This is a very effective way of developing your knowledge of HTML, allowing you to view how particular effects within web pages have been created.
HTML
Tags
HTML documents basically consist of text marked with tags which tell the browser how to present its layout and style.
These tags can consist of elements, attributes and values.
e.g.
The following tag:
<p align="center">Hello!</p>
produces the following when placed in an HTML document:
Hello!
The tag is made up of an element, an attribute and a value as follows:
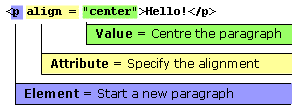
A tag showing an element, an attribute and a value
Similarly, the following tag:
<body bgcolor="#ffff00">...the body of
                                        the HTML page goes here...</body>
adds the following yellow background colour to the entire page:
This is also made up of an element, an attribute and a value as follows:
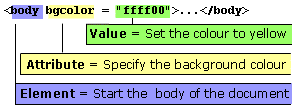
A tag showing an element, an attribute and a value
Further details about these tags are given below.
Elements
The usual pattern for elements tags is:
<Open tag> text </close tag>
e.g. 1
<p>To everyone:</p><p>Hello!</p>
This produces two new paragraphs. The first consisting of the words
'To everyone:' and the second consisting of the word
'Hello!', as follows:
To everyone:
Hello!
e.g. 2
<p>To everyone: <strong>Hello!</strong> </p>
This produces:
To everyone: Hello!
e.g. 3
<p>To everyone: <strong>Hello!</strong></p>
                                        <p><em>Hello!!</em></p>
This produces:
To everyone: Hello!
Hello!!
It is good practice to ensure that your tagging is symmetrical as in the following diagram:

A symmetrical tag structure
and to avoid an unsymmetrical structure as in the following:

An unsymmetrical tag structure
This will ensure your pages comply with standards and will help to avoid the chance of information being displayed incorrectly.
Although most tags follow the open tag (<>)
and close tag(</>) format, there are certain
key tags which stand alone.
The three most common examples are:
<br>
which produces a new line.
<hr>
which produces a horizontal line, e.g.
<img src ="smiley.gif>
which shows an image (on this occasion an image called 'smiley.gif' saved in the same folder as the web page).
e.g.

It is now increasingly common to see these tags 'closed' by the addition of a space and a forward slash before the closing bracket, as follows:
<br />

                                        <hr />

                                        <img src ="smiley.gif />
This is because the latest standards of XHTML state that all tags should be closed.
Attributes
and values
Depending on the element used, different attributes and values can be applied. Some require an attribute and value while, for others, they are optional extras.
The typical pattern is to include them within the tag as follows:
<element attribute1="value" attribute2="value">Add
                                        content here...</element>
Try to maintain consistency in the use of spaces and inverted commas as in the pattern above. This will ensure that browsers render the HTML fully and consistently, and it will also ensure your code meets the latest standards.
Thus, for example, the following should be avoided as the browser may not connect the value to the attribute correctly:
attribute1 = "value" attribute2 = "value"
attribute1 = value attribute2 = value
attribute1="value"attribute2="value"
Typically, attributes and values alter the style of text, images or other parts of a page. For example, they change the size, colour, or layout in different ways.
The effect of different attributes and values is discussed within each section below.
NB. For size values, it is good practice to use relative sizing rather than absolute sizing. Relative sizes are expressed in percentage terms or, in the case of font-size, in terms of 'ems'. These sizes allow the user to change the appearance of the page according to preference or accessibility requirements. The use of absolute values such as pixels prevents resizing in many browsers which may cause accessibility problems for users of the questionnaire. This issue is discussed in greater detail in the 'Key design issues' section of this 'Technical guide' module.
HTML
Document structure
HTML documents should begin with a DOCTYPE (document type) definition, known as a DTD. This declares what type of page it is and what language is being used, and it allows the page to be validated as conforming to Worldwide Web Consortium (W3C) standards.
The breakdown of the DOCTYPE information is as follows:
- DOCTYPE HTML PUBLIC - Declares the page as an HTML page for public browsers.
- HTML 4.01 Transitional - Declares that HTML version 4 is being used.
- EN - Declares that the page is written in English.
This must be followed by a root element '<html>' which allows the browser to display the page. The <html> tag must be closed at the very end of the document using '</html>'
Following this information, HTML documents are basically divided into two sections. The head and the body.
The beginning of each is marked within the 'open tags' <>
and the end of each is marked by the close tag </>.
They are highlighted with arrows (![]() )
in the HTML page below:
)
in the HTML page below:
<!DOCTYPE HTML PUBLIC "-//W3C//DTD HTML 4.01 Transitional//EN">
<html>
![]() <head>
<head>
<title>My web page</title>
<meta http-equiv="Content-Type" content="text/html;
                                        charset=iso-8859-1">
![]() </head>
</head>
![]() <body>
<body>
<h1>My Page</h1>
<p>Welcome to my web page</p>
![]() </body>
</body>
</html>
More details about these sections are given below.
The
head
The head contains information which is basically not intended for display. It is loaded into the browser before the body section.
A typical head sections is as follows:
<head>
<title>Add pagetitle here</title>
<meta http-equiv="Content-Type" content="text/html;
                                        charset=iso-8859-1">

                                        <meta name="description" content="add description
                                        here">

                                        <meta name="keywords" content="keyword1, keword2
                                        etc.">

                                        <meta name="author" content="author name">

                                        <meta name="copyright" content="copyright information
                                        ">
<link href="filename.css" rel="stylesheet"
                                        type="text/css">
<script language="javascript" src="filename.js"
                                        type="text/javascript"></script>
</head>
Each section of this is explained below:
<title></title>
<title>Add pagetitle here</title>
This states what the title of the page is, allows the title to be displayed at the top of the browser window, and provides a title that can be saved to a user's favourites list.
meta
commands
<meta http-equiv="Content-Type"
                                            content="text/html; charset=iso-8859-1">

                                            <meta name="description" content="add description
                                            here">

                                            <meta name="keywords" content="keyword1, keword2
                                            etc.">

                                            <meta name="author" content="author name">

                                            <meta name="copyright" content="copyright information
                                            ">
These commands provide information about your pages. They are useful for search engines which use them to store information about pages for searching. They also provide useful information for allowing pages to be stored in repositories.
A common meta command is:
<meta http-equiv="Content-Type"
                                                content="text/html; charset=iso-8859-1">
This describes the type of content and which set of characters is in use.
Other meta tags (mostly self-explanatory) are as follows:
<meta name="description" content="add
                                                description here">

                                                <meta name="keywords" content="keyword1, keword2
                                                etc.">

                                                <meta name="author" content="author name">

                                                <meta name="copyright" content="copyright
                                                information ">
Particularly useful meta tags for online questionnaires are as follows:
<meta name= "HTdig" content = "htdig-noindex">

                                                <meta name="robots" content = "noindex">
These tags prevents search engines from indexing the page and thus prevent the page from being included in searches. (Note that some search engine robots may ignore these tags and index the page, but use of the tags is still likely to reduce indexing).
Cascading
Style Sheets (CSS)
<link href="filename.css"
                                            rel="stylesheet" type="text/css">
Cascading Style Sheets are useful for applying styles (layout, colours, positioning etc) across all elements of web pages. The aim is to separate the presentation of web content from the structure.
The Style Sheet information is placed as follows:
1. In the document head between the tags
<style type="text/css">
and
</style>
or
2. In a separate file which the web page refers to through a link placed in the head (This allows changes made to one file to work across all the pages which link to that file and prevents the need to change each file individually). The link is as follows:
<link href="filename.css" rel="stylesheet"
                                                type="text/css">
See the 'Introduction to CSS' section for more information on the use of Style Sheets.
Scripts
<script language="javascript"
                                            src="filename.js" type="text/javascript"></script>
Scripts (e.g. JavaScript or VB Script) are placed in the head . A reference to the script is then placed in the body which 'calls' the script in order to perform an action such as checking that a form element has been completed. The script will be loaded into the browser before it is needed as the head section loads before the body.
Scripts are placed between the tags
<script language="javascript" type="text/javascript">
and
</script>
As with CSS, scripts can be saved in a separate file which the web page refers to through a link placed in the head (Again, this allows changes to be easily applied to all the pages which use a particular script).
The link is as follows:
<script language="javascript" src="filename.js"
                                                type="text/javascript"></script>
See the 'Introduction to JavaScript', 'Key design issues' and 'Form validation' sections for more information about scripting.
The
body
The body of an HTML document contains the main display content. It is here that text, images, links, form elements, tables and lists are placed.
A brief overview of each of the main types of content (with the exception of forms) is given in the next section of this guide, 'Introduction to HTML 2'. For information about creating forms in HTML, see the 'Web forms' section.
Learning
activity: Review
![]() Check your understanding of HTML document structure by completing
the following HTML page. The missing information is given
at the top of the page and you should drag this to the correct
positions. Press 'check answers' at the bottom of the page
for feedback. (An alternative text-only version is provided
below).
Check your understanding of HTML document structure by completing
the following HTML page. The missing information is given
at the top of the page and you should drag this to the correct
positions. Press 'check answers' at the bottom of the page
for feedback. (An alternative text-only version is provided
below).
Text-only
alternative
![]() Check
your understanding of HTML document structure by completing
the following HTML page. The missing information is given
below, and you should enter the information in the correct
text boxes. Select 'Answers' at the bottom of the page
to view the complete HTML.
Check
your understanding of HTML document structure by completing
the following HTML page. The missing information is given
below, and you should enter the information in the correct
text boxes. Select 'Answers' at the bottom of the page
to view the complete HTML.
Missing information:
</html> | </p>
| <em> | <script>
| </head> | <strong>
| meta | </body>
| </title> | <html>
HTML Document:
Answers
<!DOCTYPE HTML PUBLIC "-//W3C//DTD
                                                                HTML 4.01 Transitional//EN">
<html>
<head>
<title>Test page</title>
<meta http-equiv="Content-Type" content="text/html;
charset=iso-8859-1">
<meta name="robots" content = "noindex">
< script language="javascript" src="myScript.js"
type="text/javascript"></script>
<link href="myStylesheet.css" rel="stylesheet"
type= "text/css">
</head>
<body bgcolor="#ffffec">
<p align="center"> <em> <strong>
Welcome </strong></em> to this website</p>
</body>
</html>