Joining Attribute Data to Boundary Data for Mapping Purposes in ArcGIS
In this example, we will match attribute data (supplied as a simple text file: "beat_atts.txt"
- click [here] to download the file) to boundary data
(represented by a set of polygons in shapefile format: "police_beats.zip" which can be
downloaded by clicking [here]) using ArcGIS.
First, it is a good idea to examine the shapefile in ArcGIS to familiarise ourselves with the
characteristics of the data. In particular, we need to know what items/fields the shapefile
contains.
Start ArcGIS with a new empty map. Select File > Add Data and then browse to the directory where the
shapefile is located and select it (e.g. police_beats.shp). Click on "Add". The shapefile will be
displayed in the Data Frame. We can look at the attributes currently stored for the polygons by
right-clicking on the layer name (i.e. police_beats) in the Layer window and selecting "Open Attribute
Table".
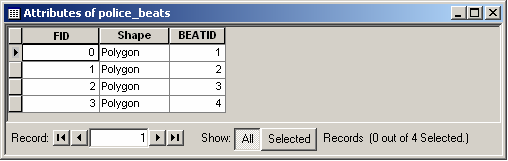
The attribute table currently contains a feature ID (which is automatically added by ArcGIS), a Shape
field (which describes the feature type, in this case polygons), and BEATID (which uniquely identifies
each polygon and which was added during data capture). The attribute data will be joined to this
boundary data through matching on a common, shared field: in this example, we will use BEATID. We also
need to know what type of item BEATID is so that we can define it in the same way in our new attribute
data. We can check the item definitions by right-clicking on the layer name, selecting "Properties" and
then choosing the "Fields" tab.

In this example, BEATID is stored as a short integer. We therefore need to ensure that the same field is
also present in the new attribute data and that it is defined in the same way.
Importing Attributes into ArcGIS
We now need to get the new attribute data into a format which can be imported into ArcGIS. ArcGIS is
capable of importing a range of file types but one of the most robust and reliable formats for importing
a set of point coordinates is dBASE(IV) format. Our attributes may originally be in a range of formats
including a simple text file, a comma-delimited (.csv) file, or a tab-delimited (.tab) file. They may
also have been processed or edited in other software packages such as Microsoft Excel and saved, for
example, as an .xls file. One of the best ways to get the attributes into dBASE format is to use
Microsoft Access. Access can import data from all of the above formats.
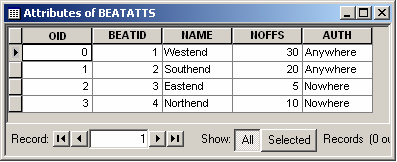
Access should be used to import the attribute data from the comma-delimited text file beat_atts.txt in
order to create a new table (e.g. called beatatts), ensuring that BEATID is present and that it is
defined as an integer. It is also good practice to define a primary key: in this case, we could use
BEATID as the primary key. Now export the table in dBASE (IV) format by right-clicking on it, specifying
a suitable location and pathname (e.g. BEATATTS.DBF) and saving it as file type dBASE (IV) (*.dbf).
We can now import the dBASE table into ArcGIS. Start ArcMap and then
select File > Add
Data. Select your .dbf file and click "Add". Open the table by right-clicking
on it and selecting "Open". Check that the filenames and data values have
all imported correctly.
We now have both our boundary data polygons and our new attribute data within ArcGIS and are therefore
ready to join the attribute data to the boundary data. We will join our newly created attribute data
table to the polygon attribute data table, based on the item BEATID.
Original polygon attribute table:
Newly created attribute data table:
Right-click on the "police_beats" layer and then select Joins and Relates > Join. This brings up the Join
Data dialog box. Say that you want to "Join attributes from a table". Select the field from the
police_beats layer on which the join will be based i.e. BEATID and then select the table which you wish
to join to this layer i.e. your newly created BEATATTS table. Say that you want to base the join on
BEATID within this table and click "OK". When you do this you will be prompted as to whether or not you
want to create an index. This is a good idea if you are dealing with a lot of records as it will
significantly improve the speed and performance of any join operations, but is not really necessary here
so click "No". ArcGIS will now join the attributes from BEATATTS to the attribute table of the
police_beats layer.
You can view the results of the join by right-clicking on the police_beats layer and selecting "Open
Attribute Table".

The original attributes are prefixed by "police_beats" whereas the newly joined attributes are prefixed
by "BEATATTS" i.e. the names of the tables from which they originated. If you wanted to, you could now
map these data. However, it is important to note that these joins are only temporary and will only exist
for this particular layer: the underlying police_beats.shp file has not been changed. Further, some
analytical and mapping functions can not be undertaken on temporarily joined fields. If you wish the
join to be permanent so that the attributes are available for future and unrestricted use, you will need
to export the joined data as a new shapefile. You can do this by right-clicking on the police_beats
layer and selecting Data > Export Data. Confirm that you wish to save all features and that you wish to
use the same coordinate system as this layer's data source, then browse to a suitable location. Note
that you will need to provide a different name to the original shapefile e.g. police_beats_atts.shp.
Save as type "shapefile" and click "Save" then "OK". Say "Yes" to add the exported data as a new layer
to the map. You now have a new shapefile with your attribute data joined. You can confirm this by
opening its attribute table.

The attributes no longer have prefixes since they are permanent fields of this shapefile. Note that any
fields from the joining table which were duplicates of the original fields will now have an underscore
and/or _1 after their name.
Remember that it is probably a good idea to remove any datasets which you no longer need (e.g. the
original police_beats.shp and the BEATATTS table) so that you don't get confused! You can do this by
right-clicking on them and selecting "Remove".
You now have set of attributes joined to a set of polygons and can proceed to map and/or analyse
them!
Copyright Attribution
ArcGIS® and ArcMap® are registered trademarks of Environmental Systems Research Institute, Inc.
(ESRI). dBASE is a registered trademark of dBASE Inc. and Access™ and Excel® are registered
trademarks of Microsoft Corporation. The software screen shots shown in this page are reprinted with
permission from ESRI.
 Homepage