Importing User-defined Variables to SASPAC
In this example, we will import a user-defined variable into SASPAC and produce the associated shaded map
using MapShore. To complete this example, click [here]
to download the
.zip file.
Save the zip archive to a local working folder and unzip its content. The archive contains boundary data
in ArcGIS Shapefile ("
_boundary.shp") format. The
attribute data file of the same area is stored as a CSV text file (
_byoa.csv"). Also included is the output area classification system file ("
_oac.sys") that is needed used in the later part of the exercise. Download the file and unzip its
content to a local folder. The attributes we want to map is the total number of offences ("NOFFS")
stored in "
_byoa.csv". The geographical reference of the data is the output area (OA) code which is recognised
by SASPAC.
Preparing Comma-delimited Data Files using Microsoft Access
The first preparatory step is to get the new attribute data into a format that can be linked with other
standard census statistics in SASPAC. This involves converting the data from a CSV file into a system
file (.SYS) in SASPAC. The conversion requires the zone code to be the first column of the data followed
by optional zone labels. The remaining data must be numeric which can be either integer or decimal
values. All the character strings, including the field labels, must be enclosed by pairs of double
quotation marks, e.g. "zoneid". Please also note that SASPAC requires that all field labels
are a maximum of eight alphanumeric characters and cannot contain spaces or special characters. These
preparatory steps are best handled by Microsoft Access.
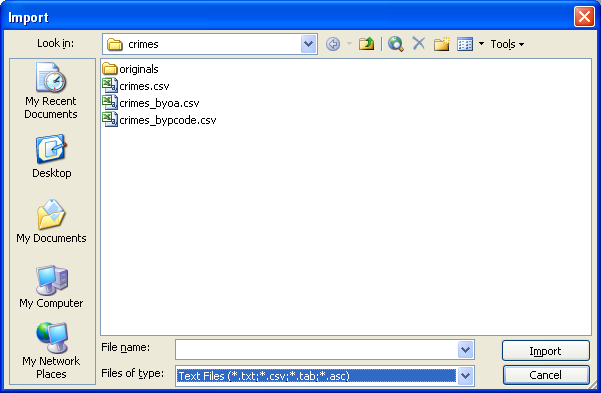
Start Microsoft Access. Select File > New... and then click the "Blank database" icon on the
New File pane on the right. Rename the file as "
_byoa.mdb" and save it to the same folder as the other data. Select File > Get External Data
> Import... and navigate to the data folder. Set the Files of type: to "Text Files (*.txt;
*.csv; *.tab; *.asc)".
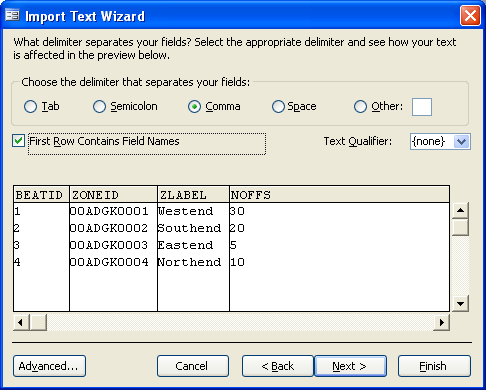
Import "
_byoa.csv". In the first step of the Import Text Wizard, make sure that the "Delimited"
file format is chosen. Click Next to move to the next step where you must check the "First Row
Contains Field Names" box. Accept all the remaining default settings and click Finish and then OK
to create a new data table.
The table will need to be rearranged so that the first two columns contain the values of zone code and
label and the type of remaining data (beatid and number of offences) is numeric. To do this,
newly-created table and then click the Design button above. The following table view should be
shown:
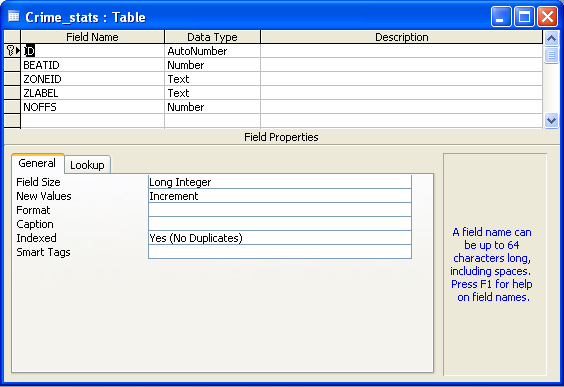
Right click on the ID field label (the first row of the data that is created automatically by Microsoft
Access) and select Delete Rows. You will need to click Yes more than once to confirm its removal. The
BEATID row should now move up to the top. Drag this row to the bottom immediately after the NOFFS row.
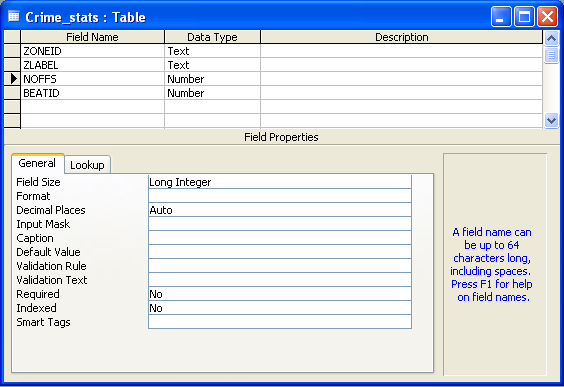
The fields in the table are now in the right order. Check the data type of each row. The first two must
be "Text" while the last two are "Number". It is also important to ensure the the
Field Size of the two number fields are "Long Integer" (or "Integer") as the data in
those columns are counts or numeric identifiers. For data such as averages or percentage scores, the
Field Size could be set to "single", "double" or "decimal" depending on
the precision requirement. The table should now be revised as follows:
Save the changes when closing the design view of the table. Select File > Export... and set the Save
as type: option to be "Text File (*.txt; *.csv; *.tab; *.asc)". Type in the File name: box
"
_byoa_saspac.csv" (it is necessary to include the .csv file extension in your input otherwise the
default .txt file type will be used) and then click the "Export" button. Accept the default
settings in the first step of the Export Text Wizard and click Next. In this step, make sure the "First
Row Contains Field Names" option is checked. All the other default settings are fine so click
Finish and then OK to export the data. The file "
_byoa_saspac.csv" should now be created in the destination folder.
Creating a New SASPAC System File from a CSV File
Start SASPAC. Close the Quickstart task menu if it is launched. Select File > New Task > Editor to
open a new command file editing window. In this editor window, input the following text exactly except
for {PATH} where the text should be replaced by the actual folder location of
the input and output files.
INPUT csv file with headers name = "{PATH}\
_byoa_saspac.csv"
READ ZONEID ZLABEL CM0010001 CM0010002
SET DSYEAR 2007
SET DSNAM CRIMES
SET DSLAB 2007_CRIMES_BYOA
SET ZONEYEAR 2001
DESCRIBE variable CM0010001 label = "Number of Offences"
DESCRIBE variable CM0010002 label = "Beat ID"
OUTPUT system file name = "{PATH}\
_byoa.sys" label = "Crimes"
END
FINISH
|
Each line of input above begins with a SASPAC command. The commands may then be followed by keywords
(e.g. DSYEAR, DSNAM, DSLAB and ZONEYEAR), variables (ZONEID, ZLABEL, CM0010001, CM0010002) or file
location and name. The last two variables (CM0010001 and CM0010002) are user specified inputs. While the
variable descriptions at lines 7 and 8 (lines beginning with the DESCRIBE command) are optional, they
are particularly useful in providing additional information about the data, e.g. the variable label, the
number of decimal places for non-integer numbers (DP=?), etc. Please refer to the SASPAC User Manual for
further details.
Click Save and then input "
_byoa" in the File name: box before clicking Save. When prompted, click Close File and Run Task to
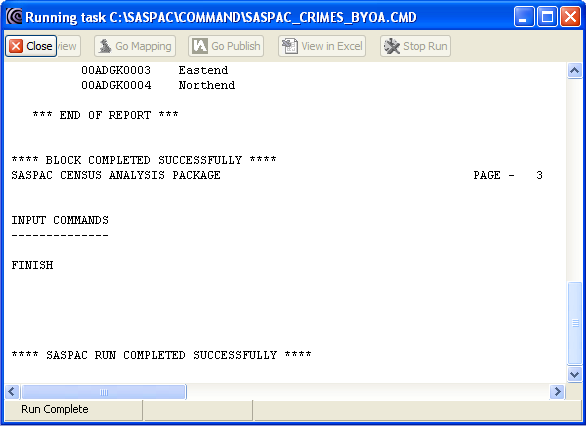
start the CSV to SYS conversion process. If the commands are completed successfully, the "****
SASPAC RUN COMPLETED SUCCESSFULLY ****" message should appear on the screen.
N.B. If the SASPAC command file (.CMD) does not run successfully and the process ends with an error
message, scroll up the window to look for the error source. Make sure all the command lines are
correctly spelt and spaced and the input CSV file is of the right format and in the right folder
location. To make any correction to the CMD file, close the current window and select File > Open
> Open Command File... and navigate to the location of the .CMD file (either in the default location
at "C:\SASPAC\COMMAND\" or in the user folder chosen during previous steps.) Make the
corrections and then repeat the steps in the paragraph immediately above to complete the task.
The CSV import process will now create a customised SYS file from which the new area attributes ("NOFFS")
can be linked with any other standard census variables available in SASPAC. This will also offer the
possibility for the linkage results to be mapped using MapShore.
Joining Attribute Data from Multiple Sources in SASPAC
In this part of the example we will join the previously created "
_byoa.sys" with an area classification, also included in the zip file for this exercise, and export
the results to a CSV file for mapping in MapShore.
First, start SASPAC if it is not already running.
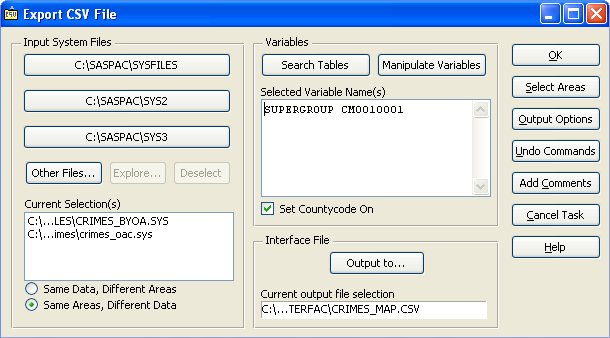
Either choose "Export CSV file" from the Quickstart task menu or select File > New Task >
Export data > CSV File... to start the "Export CSV File" window. Click on the "Other
Files..." button and navigate to where the .SYS files are stored (either the same folder as the
other data or the default location at "C:\SASPAC\SYSFILES\") in order to open the newly
created "
_byoa.sys". Repeat the steps to locate and then add the output area classification data ("
_oac.sys") for the same area. .
Click the "Same Area, Different Data" radio button to indicate that the two files cover the
same area. In the "Select Variable Name(s)" field within the Variables section, type "SUPERGROUP"
and "CM0010001" (the variable names for area classification and number of offences
respectively). At this stage it is possible for the user to specify the areas where data are linked by
using the "Select Areas" command. As we are going to link all the data, we can skip the "Select
Areas" stage but proceed to specify the name and location of the output CSV file by clicking the
"Output to..." button. Accept the default location (which is likely to be "C:\SASPAC\INTERFAC\")
and name the file as "
_map.CSV". Please note that SASPAC is not case sensitive and tends to change all filename to
uppercase regardless of the user inputs.
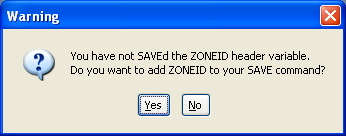
Click OK and then Yes when prompted to add the ZONEID header variable to the output file.
In the Task dialog box, accept all the default settings and click OK to execute the SASPAC commands. If
any of the system or output file already exist, the file replacement warning will appear. Discard the
warning and click Continue or Yes to proceed. The commands should then be completed with the following
message appearing in the log file window:
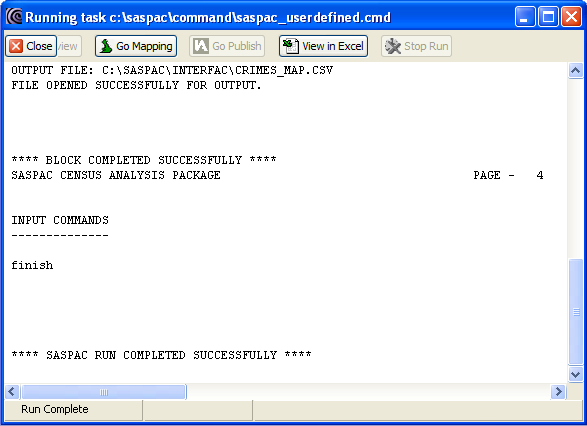
The process will create the "
_map.csv" file in the default output file folder of SASPAC (normally in "C\SASPAC\INTERFAC\").
This file in conjunction with the boundary data ("
_boundary.shp") can now be imported to MapShore. Using the standard thematic mapping procedures in
MapShore, users should be able to produce a map simultaneously showing the two attributes of area
classification ("SUPERGROUP") and
figures ("CM0010001").
Copyright Attribution
ArcGIS® is a registered trademark of Environmental Systems Research Institute, Inc. (ESRI). The
Small Area Statistics Package (SASPAC) software is owned by the Improvement and Development Agency for
Local Government (IDeA). MapShore is a registered trademark of Pebbleshore Ltd. and Access™ is a
registered trademark of Microsoft Corporation. The software screen shots shown in this page are
reprinted with permission from IDeA and Microsoft Corporation.
 Homepage